
Securing your home server behind a proxy with wireguard
Published:
Do you have a home server that you want to access securely from outside your home network, but it has no static IP, you don’t want to open ports on your router, and you want to keep your home IP address private? This post will guide you through setting up a proxy using wireguard to securely access your home server from anywhere.
Motivation
A home server is a great way to host your own services, ranging from simple web servers, home automation systems, media servers, game servers, etc. However, once you start hosting services in the comfort of your home, you may want to access them from outside your home network, even setting up a domain name for easy access.
Yet you might be reluctant to expose your home IP address to the world. This raises security and privacy concerns, as exposing your home IP address can make you vulnerable to attacks and unwanted attention.
That’s where a proxy comes in. A proxy acts as an intermediary between your home server and the outside world, allowing you to access your services securely without exposing your home IP address. This is very commonly used to host multiple services on the same computer, using nginx for example. In our case, we will use wireguard to set up a VPN tunnel between your home server and a remote server that will act as the proxy1.
While that’s not too complicated on principle, it can be a bit tricky to set up.
Requirements
Getting a free VPS to host the proxy
We will use a VPS (Virtual Private Server) to host the proxy. This VPS will be the public face of your home server, for instance you can use it to host your domain name. There are many providers that offer low-cost VPS, but here we’re looking for the cheapest option possible: free.
One option I can recommand is to use Oracle Cloud, which offers a free tier with a small VPS (VM.Standard.A1.Flex: 4 cores ARM CPU, 24GB of RAM) that will be more than enough for our use case.
Oracle Cloud setup
- Create an Oracle Cloud account at cloud.oracle.com and register for the free tier.
- Enable Pay As You Go billing or you won’t have any available resources.
- Create a new compute instance:
- Choose the VM.Standard.A1.Flex shape.
- Use linux as the operating system (Ubuntu 24.04 is a good choice).
- Assign a static public IP address to the instance:
- Go to your instance details page.
- Click on Attached VNICs.
- Go to IPv4 Addresses.
- First change to No public IP to get rid of the ephemeral IP.
- Then change to Reserve Public IP.
- Set up SSH and make sure you can connect to the instance.
Setup
Wireguard overview
You can find the official documentation for wireguard here. In short, wireguard is a modern VPN protocol that is really light-weight. From my experience, it is very reliable and I never had any issues with this tunnel. Contrary to most VPN solutions that are based on a client-server architecture, wireguard is based on a peer-to-peer architecture. This makes it similar to SSH in spirit. In our case we will have two peers: the home server and the VPS. The home server will be the client and the VPS will be the server. That will allow us to:
- Hide the home server IP.
- Connect to the home server despite it not having a static IP address.
- Connect to the home server despite not opening any ports on the router.
That’s possible because the home server will initiate the connection to the VPS, which will then allow the VPS to connect back to the home server. This is a common pattern in peer-to-peer networking.
Wireguard installation
Backup iptables rules
Before we start, backup your iptables rules on the VPS, this might be useful in case something goes wrong and you need to restore the original rules:
sudo iptables-save > backup.iptables
If you don’t know what iptables is, it is a tool to manage the firewall rules on Linux. It allows you to control the incoming and outgoing traffic on your server. I would recommend you to read about it if you are not familiar with it.
Open port for wireguard
On Oracle Cloudn go to Networking > Virtual Cloud Networks > Your VCN > Security List Details > Ingress Rules and add a new rule to allow incoming traffic on the wireguard port (I will use 42295 in this example, this is the port that wireguard will use to listen for incoming connections):
| Source Type | Source CIDR | IP Protocol | Source Port Range | Destination Port Range |
|---|---|---|---|---|
| CIDR | 0.0.0.0/0 | UDP | 42295 | 42295 |
Then on the VPS, open the port in iptables:
sudo iptables -I INPUT 6 -m state --state NEW -p udp --dport 42295 -j ACCEPT
Also make sure to persist the iptables rules:
sudo apt install iptables-persistent netfilter-persistent
sudo netfilter-persistent save
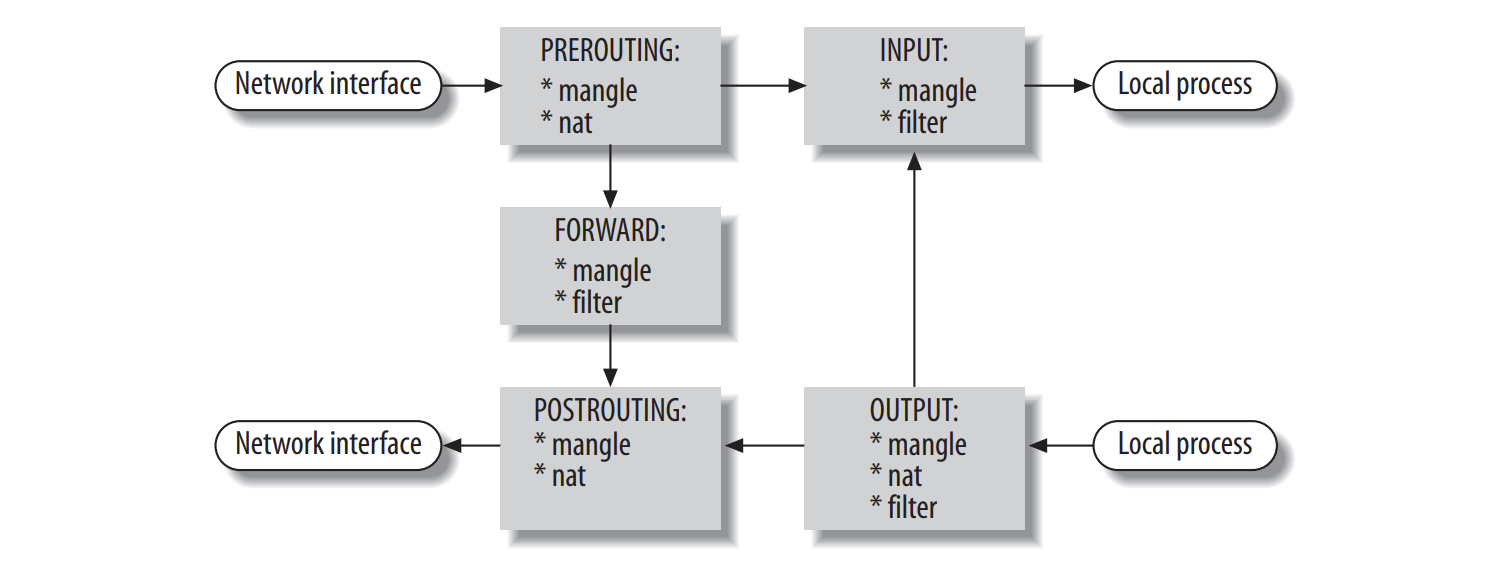
Depending on the default iptables rules you have, you might need to do a few more tweaks to allow incoming traffic on the wireguard port. Keep in mind the following diagram: you need to allow traffic from your main network interface to the local wireguard process, which means that only the PREROUTING and INPUT chains need to be modified.
For debugging purposes, you can use the curl command to initiate connections from the home server, and the tcpdump command to monitor the traffic on the VPS.
Install wireguard and create keys
Start by installing wireguard on both the client (home server) and the server (VPS). These commands will install wireguard and create pairs of public/private keys for each peer:
sudo apt install wireguard
sudo -i
cd /etc/wireguard/
umask 077; wg genkey | tee privatekey | wg pubkey > publickey
Home server configuration
On the home server, add the following configuration to /etc/wireguard/wg0.conf (replace $HOME_PRIVATE_KEY and $VPS_PUBLIC_KEY with the actual keys you generated and $VPS_PUBLIC_IP with the public IP of your VPS):
# local settings for the private server
[Interface]
PrivateKey = $HOME_PRIVATE_KEY
Address = 10.0.10.1
Table = 123

PreUp = ip rule add from 10.0.10.1 table 123 priority 456
PostDown = ip rule del from 10.0.10.1 table 123 priority 456

# remote settings for the public server
[Peer]
PublicKey = $VPS_PUBLIC_KEY
Endpoint = $VPS_PUBLIC_IP:42295
AllowedIPs = 0.0.0.0/0
PersistentKeepalive = 25
Explanation of the configuration: The [Interface] section defines the local settings for the home server. Address is the IP address assigned to the home server in the VPN network, Table is used to define a custom routing table for the VPN traffic, PreUp and PostDown are commands that are executed before and after the interface is brought up or down, respectively. In the [Peer] section, we define who the remote peer is using its public key, and the Endpoint is the public IP address of the VPS, which means that the home server will initiate the connection to the VPS. AllowedIPs defines which (target) IP addresses are allowed to be routed through the VPN tunnel (all IPs in this case).
VPS configuration
For this example, we will assume that you want to forward HTTP traffic (TCP port 80) from the VPS to the home server (also open this port in the firewall like we did for port 42295, but for TCP protocol this time). Note that you can forward any port/protocol you want, and that the destination port can be different from the source port (e.g. you can connect to the home server with SSH through this proxy, but you need to use a different port than 22 on the VPS).
On the VPS, add the following configuration to /etc/wireguard/wg0.conf (replace $VPS_PRIVATE_KEY and $HOME_PUBLIC_KEY with the actual keys you generated):
# local settings for the public server
[Interface]
PrivateKey = $VPS_PRIVATE_KEY
Address = 10.0.10.2
ListenPort = 42295

# packet forwarding
PreUp = sysctl -w net.ipv4.ip_forward=1

# port forwarding
PreUp = iptables -t nat -A PREROUTING -i enp0s6 -p tcp --dport 80 -j DNAT --to-destination 10.0.10.1:80
PreUp = iptables -t filter -A FORWARD -i enp0s6 -o wg0 -p tcp --dport 80 -j ACCEPT
PreUp = iptables -t filter -A FORWARD -i wg0 -o enp0s6 -p tcp --sport 80 -j ACCEPT

PostDown = iptables -t nat -D PREROUTING -i enp0s6 -p tcp --dport 80 -j DNAT --to-destination 10.0.10.1:80
PostDown = iptables -t filter -D FORWARD -i enp0s6 -o wg0 -p tcp --dport 80 -j ACCEPT
PostDown = iptables -t filter -D FORWARD -i wg0 -o enp0s6 -p tcp --sport 80 -j ACCEPT

# remote settings for the private server
[Peer]
PublicKey = $HOME_PUBLIC_KEY
AllowedIPs = 10.0.10.1
Explanation of the configuration: The [Interface] section defines the local settings for the VPS. Address is the IP address assigned to the VPS in the VPN network, ListenPort is the port on which the VPS will listen for incoming connections from the home server. The PreUp and PostDown commands are used to set up port forwarding from the interface enp0s6 (the public interface of the VPS) to the wireguard interface wg0. For the [Peer] section in this case there is only one AllowedIPs entry, which is the IP address of the home server in the VPN network, which means that the VPS will only route traffic to this IP address through the VPN tunnel. And the only way to have traffic targeting the home server is through the port forwarding rules we set up, so we have a clear control of what traffic is allowed to go through the VPN tunnel.
Starting it up
On both the home server and the VPS, you can now start the wireguard interface with the following command:
sudo systemctl enable wg-quick@wg0
sudo systemctl start wg-quick@wg0
Then you can check the status of the wireguard interface with:
sudo wg
After a few seconds, you should see the connection established between the home server and the VPS:
interface: wg0
  public key: (hidden)
  private key: (hidden)
  listening port: 42295

peer: (hidden)
  endpoint: X.X.X.X:XXXXX
  allowed ips: 10.0.10.1/32
  latest handshake: 1 minute, 23 seconds ago
  transfer: 25.58 MiB received, 1.28 MiB sent
If connections are not established, don’t panick! You probably did everything right, but are having trouble with the firewall rules. Double check that the firewall rules are set up correctly on Oracle Cloud, and that the iptables rules are set up correctly on the VPS. Use netcat and tcpdump to find where the packet loss is happening. Keep the diagram above in mind to understand how the traffic is routed.
Creating some UDP packets with netcat:
echo "dummy message" | nc -u $host $port
Listening for incoming packets:
tcpdump -i any -n port $port
Gotcha tip: Depending on your setup you may or may not be affected by this, but it’s worth mentioning: iptables rules are cached for a given connection, this means that if you change the rules while a connection is already established, the new rules will not be applied to the existing connection.
Conclusion
You should now have a working proxy setup with wireguard, allowing you to securely access your home server from anywhere without exposing your home IP address. You can extend the iptables rules on the VPS to forward other ports or protocols as needed, and you can also set up a domain name to point to the VPS IP address for easier access.
Why not directly host your services on the remote server you may ask ? One use case is to host a home automation system that requires access to local devices, such as smart plugs, lights, etc. ↩